
How to Set Up a Sub Bottom Profiler
Set Up Your Sub Bottom Profiler for Accurate Sub-Seabed Imaging
A properly installed Sub Bottom Profiler helps surveyors identify sediment layers, buried pipelines, cables, rocks, and geological features beneath the seabed with high accuracy.
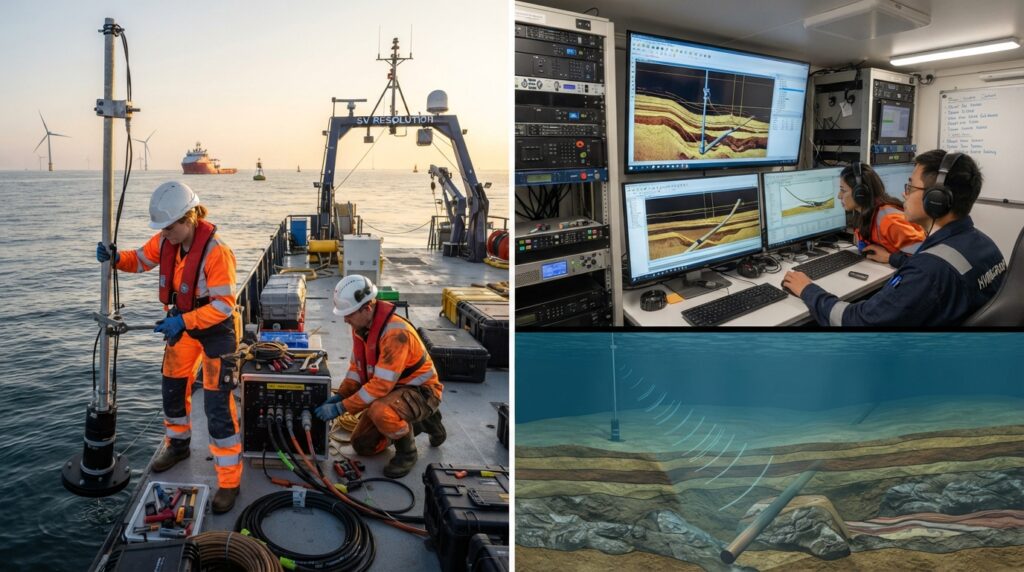
Introduction
Before starting a marine geophysical survey, the Sub Bottom Profiler must be installed and tested correctly.
The transducer, positioning system, motion sensor, and survey software must all work together to produce clear and reliable sub-seabed profiles.
A proper setup improves data quality and reduces errors during processing.
Equipment Required
Before installation, prepare the following equipment:
- Sub Bottom Profiler Transducer
- Transceiver
- Power Supply
- GNSS Receiver
- GNSS Antenna
- Motion Sensor (MRU/INS)
- Survey Computer
- SBP Acquisition Software
- Data Storage Device
- Survey Vessel
Step 1 – Inspect the Equipment
Inspect the transducer, cables, connectors, power supply, and computer before starting the survey.
Make sure there are no damaged cables, loose connections, or signs of water entering the equipment.
Confirm that every component is working properly.
Step 2 – Install the Transducer
Mount the Sub Bottom Profiler transducer securely on the survey vessel.
It may be installed on a pole, over-the-side mounting frame, moon pool, catamaran frame, or hull-mounted bracket depending on the survey vessel.
The transducer should remain fully underwater during the survey and should not be affected by air bubbles or vessel vibration.
Step 3 – Connect the Survey System
Connect the transducer to the transceiver.
Connect the transceiver to the survey computer.
Connect the GNSS receiver and Motion Sensor (MRU/INS) so that position and vessel motion are recorded together with the acoustic data.
Check that all equipment communicates correctly before continuing.
Step 4 – Configure the Survey Software
Create a new survey project.
Configure:
- Coordinate System
- Project Datum
- Pulse Type
- Frequency
- Pulse Length
- Recording Rate
- Data Storage Location
- Navigation Input
- Motion Sensor Input
Verify all settings before recording data.
Step 5 – Perform a System Test
Switch on the Sub Bottom Profiler and monitor the live display.
Check that acoustic reflections from the seabed are visible.
If the signal is weak or unstable, inspect the transducer position, cable connections, and software settings.
Step 6 – Select the Correct Frequency
Choose the operating frequency according to the survey objective.
Lower frequencies provide deeper penetration below the seabed.
Higher frequencies produce better detail but do not penetrate as deeply.
Select the frequency that best matches the project requirements.
Step 7 – Verify Positioning
Confirm that the GNSS receiver is providing accurate vessel positions.
Check that the Motion Sensor (MRU/INS) is recording vessel roll, pitch, and heading correctly.
Accurate positioning is essential for reliable sub-seabed profiles.
Step 8 – Start the Survey
Navigate along the planned survey lines at a constant speed.
Monitor:
- Live SBP Profile
- GNSS Position
- Vessel Heading
- Motion Sensor Data
- Signal Quality
- Recording Status
Record all data continuously throughout the survey.
Step 9 – Check Data Quality
Review the recorded profiles during the survey.
Ensure sediment layers appear continuous and clear.
If excessive noise is present, reduce vessel speed or inspect the installation.
Correct any problems before continuing.
Common Mistakes to Avoid
Do not install the transducer where air bubbles pass beneath the vessel.
Avoid loose mounting brackets that cause vibration.
Do not use incorrect frequency settings.
Always verify GNSS positioning before recording data.
Never ignore poor signal quality during the survey.
Best Practices
Mount the transducer in clean water away from propeller turbulence.
Maintain a steady vessel speed.
Check signal quality throughout the survey.
Save backup copies of survey data every day.
Inspect cables and connectors after each survey.
Follow the manufacturer’s maintenance schedule.
Conclusion
A properly installed Sub Bottom Profiler provides clear images of the layers beneath the seabed. Correct installation, accurate positioning, suitable frequency selection, and continuous quality checks help survey teams produce reliable geophysical data for offshore engineering, dredging, marine construction, and environmental studies.