
How Does a Dozer System Work?
Learn the Complete Working Process of a Modern Dozer System
A modern dozer system combines engine power, hydraulic controls, heavy-duty tracks, and intelligent machine control technology to move and level large amounts of material. This guide explains every step of the working process in simple language.
Introduction
A dozer is one of the first machines to arrive on most construction projects because it is responsible for preparing the ground before other machines begin their work.
The machine pushes soil, removes obstacles, spreads fill material, creates working platforms, and levels the ground. Modern dozers can also follow digital design models using GNSS and 3D machine control systems, allowing operators to work faster and more accurately.
Although a dozer looks simple from the outside, many systems work together inside the machine. The engine provides power, the hydraulic system controls the blade, the tracks move the machine across rough ground, and the onboard computer continuously monitors the machine’s performance.
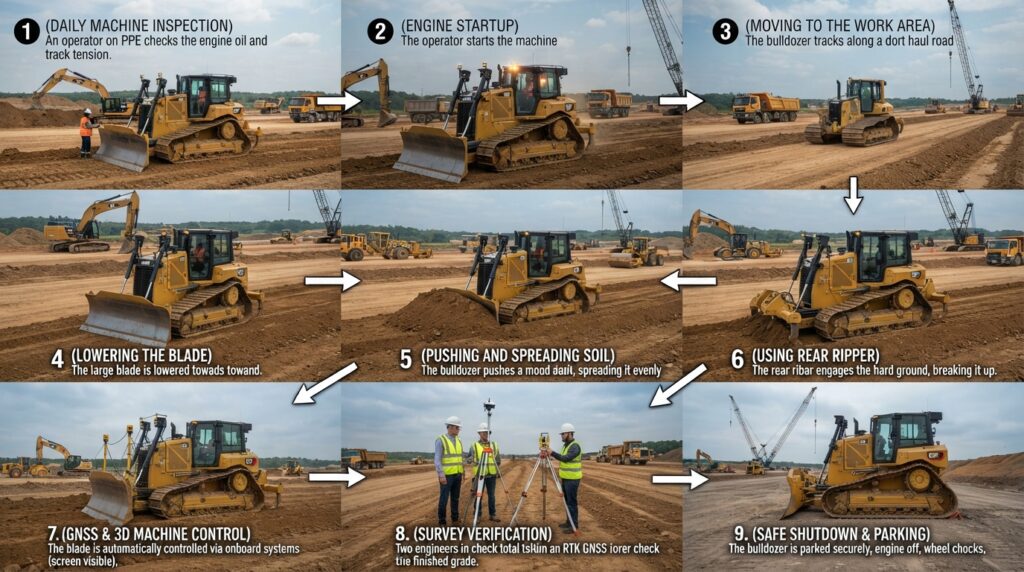
Step 1 – Inspect the Machine
Every working day starts with a complete machine inspection.
The operator checks the engine oil, hydraulic oil, coolant, fuel level, air filters, battery, hydraulic hoses, blade condition, cutting edges, tracks, rollers, idlers, sprockets, ripper, lights, cameras, and safety systems.
If the machine is equipped with GNSS or 3D machine control, the antennas, sensors, cables, and display should also be checked before work begins.
A proper inspection reduces unexpected breakdowns and improves safety.
Step 2 – Start the Engine
The diesel engine is started and allowed to idle for several minutes.
This gives the engine oil and hydraulic oil enough time to circulate through the machine before heavy work begins.
The operator checks the digital display for warning lights, hydraulic pressure, engine temperature, fuel level, and system status before moving the machine.
Step 3 – Move to the Work Area
The dozer travels to the construction area using its heavy-duty steel tracks.
Unlike wheeled machines, tracked dozers distribute their weight over a larger area. This allows them to work on soft soil, sand, mud, loose gravel, and uneven ground without sinking.
The operator positions the machine according to the project plan before starting earthmoving operations.
Step 4 – Lower the Blade
The front blade is the primary working tool of the dozer.
Using hydraulic controls, the operator lowers the blade until it reaches the required cutting depth.
Depending on the task, the blade may be adjusted to cut soil, spread fill material, or create a finished surface.
The blade position can be raised, lowered, tilted, or angled depending on the machine model.
Step 5 – Push and Move Material
As the dozer moves forward, the blade cuts into the ground and pushes the material ahead of the machine.
The operator controls the blade height continuously to maintain the required level.
The pushed material may include:
- Soil
- Sand
- Gravel
- Clay
- Rock Fragments
- Construction Fill
Several passes may be required to achieve the desired grade.
Step 6 – Use the Ripper (When Required)
If the ground is too hard for the blade to cut, the rear-mounted ripper is used first.
The ripper breaks compacted soil, weathered rock, old pavement, or hard clay into smaller pieces.
Once the material is loosened, the blade can move it much more easily.
Step 7 – Work with 3D Machine Control
Modern dozers are often equipped with advanced machine control systems.
These systems continuously compare the blade position with the digital design model.
Common technologies include:
- GNSS Positioning
- GPS Guidance
- Robotic Total Station Guidance
- Laser Guidance
- IMU Sensors
- Blade Position Sensors
The system automatically provides guidance to the operator and, on many machines, can even adjust the blade automatically to maintain the correct elevation and slope.
This reduces survey stakes, saves time, and improves grading accuracy.
Step 8 – Check the Finished Grade
After completing the earthmoving work, survey engineers verify the finished surface.
They may use:
- RTK GNSS Receiver
- Robotic Total Station
- Digital Level
- Drone Survey
- Laser Scanner
If corrections are needed, the dozer performs additional passes until the required design level is achieved.
Step 9 – Park the Machine Safely
At the end of the workday, the machine is parked on firm and level ground.
The blade and ripper are lowered completely to the ground, the parking brake is applied, and the engine is allowed to idle briefly before being switched off.
The operator performs a final inspection and removes any soil or debris from the blade, tracks, and undercarriage.
Safety Guidelines
Safe operation is essential on every project.
Always inspect the machine before starting work.
Wear appropriate personal protective equipment (PPE), including a safety helmet, high-visibility vest, safety boots, gloves, and eye protection.
Keep people away from the working area and maintain good communication with other equipment operators.
Never operate the machine on unstable slopes beyond the manufacturer’s recommended limits.
Always check for underground utilities, overhead power lines, and hidden obstacles before starting work.
Best Practices
Daily inspections should be carried out before every shift.
Keep the blade and cutting edges in good condition.
Clean the undercarriage regularly to prevent excessive wear.
Calibrate the machine control system whenever required.
Follow the project design instead of estimating blade levels by eye.
Schedule routine maintenance according to the manufacturer’s recommendations to maximize machine life and reliability.
Conclusion
A modern dozer system combines engine power, hydraulic technology, heavy-duty tracks, and intelligent machine control to perform earthmoving work with speed and precision. From site preparation to final grading, every part of the system contributes to safe and efficient construction. Understanding how a dozer system works helps operators, engineers, and contractors improve productivity, reduce operating costs, and achieve higher-quality project results.