
How to Set Up a Wave Rider Buoy
Install a Wave Rider Buoy for Reliable Ocean Wave Monitoring
A properly installed Wave Rider Buoy provides continuous and accurate wave measurements. Correct installation helps engineers collect reliable data for offshore construction, dredging, hydrographic surveys, and coastal monitoring.
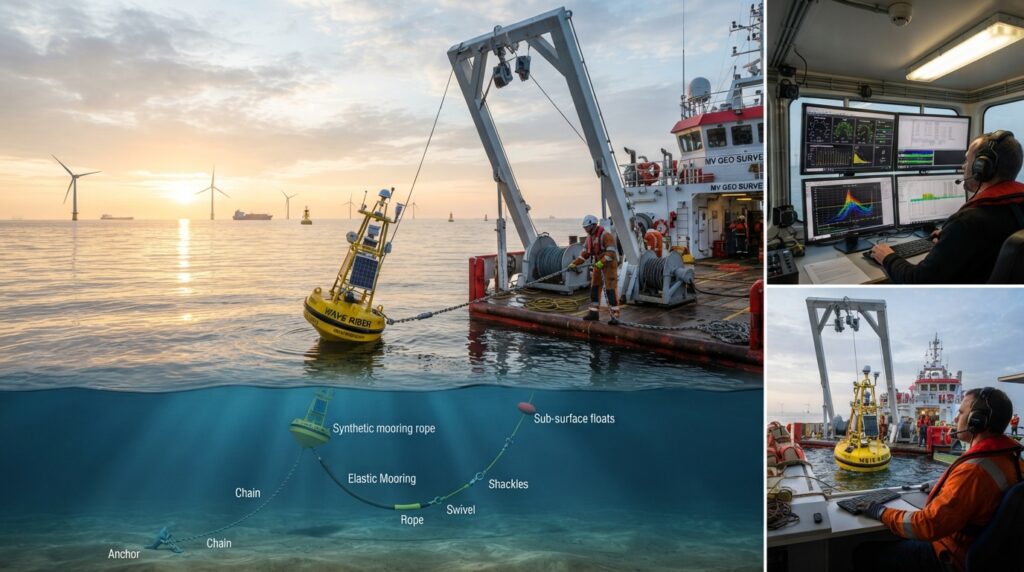
Introduction
Before starting any offshore project, the Wave Rider Buoy should be installed correctly.
The buoy must be deployed at the selected location, securely anchored to the seabed, connected to its communication system, and tested before data collection begins.
A proper setup ensures stable operation even in changing sea conditions.
Equipment Required
Before installation, prepare the following equipment:
- Wave Rider Buoy
- Mooring Chain
- Synthetic Mooring Rope
- Elastic Rubber Mooring Section
- Swivel Connectors
- Shackles
- Seabed Anchor
- GNSS Receiver
- Communication Antenna
- Solar Panel
- Battery Pack
- Data Logger
- Deployment Crane or A-Frame
- Work Boat or Survey Vessel
Step 1 – Inspect the Equipment
Inspect the buoy, mooring line, chain, shackles, anchor, antennas, solar panel, battery, and sensors.
Check that all connections are secure and there is no physical damage.
Confirm that the battery is fully charged before deployment.
Step 2 – Configure the Buoy
Before launching the buoy, connect it to the configuration software.
Set:
- Station Name
- Sampling Interval
- Recording Interval
- Time Zone
- Communication Method
- GNSS Settings
- Data Transmission Schedule
Save the configuration and verify that all settings are correct.
Step 3 – Prepare the Mooring System
Assemble the complete mooring system.
Connect the anchor, chain, elastic mooring section, rope, swivels, and buoy in the correct order.
Inspect every connection before deployment.
Step 4 – Deploy the Anchor
Move the survey vessel to the planned deployment position.
Lower the anchor slowly to the seabed using the vessel crane or hydraulic A-frame.
Confirm that the anchor reaches the correct position.
Step 5 – Deploy the Wave Rider Buoy
After the anchor is placed, slowly release the mooring line and lower the buoy into the water.
Allow the buoy to float naturally while maintaining the correct mooring tension.
Avoid sudden drops that may damage the sensors.
Step 6 – Check Communication
After deployment, verify that the buoy is transmitting data to the monitoring station.
Check:
- GNSS Position
- Battery Status
- Signal Strength
- Wave Data
- System Health
Confirm that communication is stable.
Step 7 – Verify Sensor Operation
Monitor the live data.
Check that wave height, wave period, and wave direction are updating correctly.
Compare the readings with local sea conditions to confirm that the system is operating normally.
Step 8 – Start Continuous Monitoring
Once all system checks are complete, begin continuous data recording.
Monitor the buoy remotely throughout the project and inspect the system periodically if required.
Common Mistakes to Avoid
Do not deploy the buoy in an unsuitable location.
Avoid using an incorrect mooring length.
Do not leave loose shackles or connectors.
Always confirm GNSS positioning before deployment.
Never ignore low battery warnings or communication failures.
Best Practices
Select a deployment location with sufficient water depth.
Use corrosion-resistant marine hardware.
Inspect the mooring system regularly.
Keep the solar panel clean.
Back up recorded data frequently.
Inspect the buoy after severe storms.
Conclusion
A properly installed Wave Rider Buoy provides reliable wave information throughout the project. Correct deployment, secure mooring, accurate GNSS positioning, and regular maintenance help engineers collect high-quality wave data for offshore engineering, hydrographic surveys, dredging, and environmental monitoring.