
How to Set Up an ADCP (Acoustic Doppler Current Profiler)
Deploy an ADCP for Accurate Ocean Current Measurements
A properly installed ADCP provides accurate information about water currents, waves, and tides. Correct deployment helps engineers collect reliable data for offshore construction, hydrographic surveys, dredging, and environmental studies.
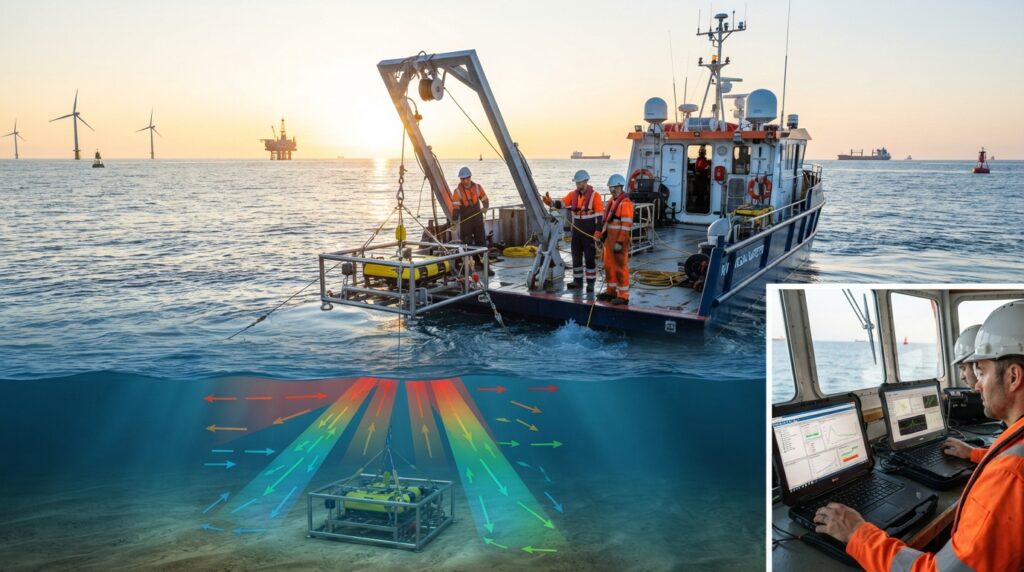
Introduction
Before deploying an ADCP, the instrument must be inspected, programmed, and tested.
The deployment frame, acoustic release system, batteries, sensors, and communication equipment should all be checked carefully before the instrument is placed on the seabed.
A proper setup ensures continuous and reliable data collection throughout the monitoring period.
Equipment Required
Before deployment, prepare the following equipment:
- Acoustic Doppler Current Profiler (ADCP)
- Bottom Mount Frame
- Acoustic Release System
- Recovery Float
- Mooring Rope
- Shackles and Swivels
- Internal Battery Pack
- Data Logger
- Configuration Software
- Laptop Computer
- GNSS Receiver
- Survey Vessel
- Hydraulic A-Frame or Crane
Step 1 – Inspect the Equipment
Inspect the ADCP body, acoustic transducers, pressure sensor, compass, battery pack, cables, connectors, and deployment frame.
Check that all components are clean, securely fitted, and free from damage.
Step 2 – Install the Batteries
Install fully charged batteries according to the manufacturer’s instructions.
Confirm that the expected battery life is sufficient for the planned deployment period.
Step 3 – Configure the ADCP
Connect the ADCP to a laptop using the manufacturer’s software.
Configure:
- Project Name
- Sampling Interval
- Measurement Cells
- Cell Size
- Deployment Time
- Recording Duration
- Wave Measurement Settings
- Compass Calibration
- Water Depth
- Time Zone
Review all settings carefully before saving them to the instrument.
Step 4 – Test the Instrument
Before deployment, perform a complete system test.
Confirm that:
- The compass is working correctly.
- The pressure sensor responds properly.
- The acoustic beams are operating normally.
- Memory is available.
- Battery status is normal.
Correct any issues before continuing.
Step 5 – Install the ADCP in the Bottom Frame
Secure the ADCP inside the seabed deployment frame.
Tighten all mounting brackets and locking bolts.
Ensure that the acoustic beams point upward toward the water surface for bottom-mounted deployments.
Step 6 – Connect the Acoustic Release System
If the project requires seabed recovery, connect the acoustic release between the deployment frame and the recovery line.
Test the release mechanism before deployment.
This allows the ADCP to be released remotely at the end of the project.
Step 7 – Deploy the ADCP
Navigate the survey vessel to the planned deployment location.
Use the hydraulic A-frame or crane to lower the ADCP slowly into the water.
Avoid sudden impacts while lowering the frame to the seabed.
Confirm the deployment position using the GNSS receiver.
Step 8 – Verify Deployment
After deployment, record:
- Deployment Time
- Water Depth
- GNSS Coordinates
- Instrument Serial Number
- Battery Status
- Project Name
These records are useful during data processing and recovery.
Step 9 – Monitor the Deployment
For long-term monitoring projects, inspect the instrument periodically if possible.
At the end of the deployment, use the acoustic release system to recover the ADCP safely.
Download the recorded data and inspect it before processing.
Common Mistakes to Avoid
- Deploying the ADCP on an uneven seabed.
- Forgetting to synchronize the instrument clock.
- Using low batteries.
- Incorrect compass calibration.
- Poor GNSS position recording.
- Deploying in areas with heavy vessel traffic without proper marking.
Best Practices
Always perform a full system test before deployment.
Calibrate the compass carefully.
Use corrosion-resistant hardware.
Record all deployment information.
Back up the downloaded data immediately after recovery.
Inspect and clean the ADCP before storing it.
Typical Deployment Duration
Depending on the project, an ADCP may remain on the seabed for:
- 15 Days
- 30 Days
- Several Months
The deployment duration depends on battery capacity, memory size, and project requirements.
Conclusion
A properly installed ADCP provides reliable measurements of ocean currents, waves, and water movement. Careful configuration, accurate deployment, and regular equipment checks help survey teams collect high-quality data for offshore engineering, dredging, hydrographic surveys, and environmental monitoring.